Purpose:
Provide instructions for how a user can add an office printer to their computer so they can print from it. This process will utilize the PrinterLogic application.
Target Audience:
Users that need to connect to an office printer.
Before We Start:
- Computer must be in the office where the printer is located.
Instructions:
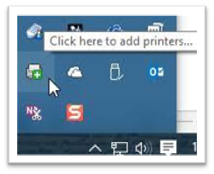
Step 1: Go to your system tray located in the Window’s Taskbar, usually at the bottom right corner of your desktop, and click on the PrinterLogic Icon to add office printer(s).
Step 2: The “Add Printer” option opens the PrinterLogic Self-service Portal, which is a browser-based tool that enables users to easily connect to an office printer. If you don’t see the printer you want to add, please submit a ticket via ariento.com/support.
Step 3: If this is your first time accessing the PrinterLogic Self-service Portal, you will be prompted to Install a Chrome Extension.
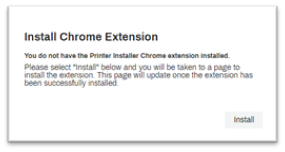
Note – If you run into any issues with installing the Chrome Extension direct link provided within the PrinterLogic Self-service Portal, you may choose the link below to complete the install of Chrome Extension.
https://chrome.google.com/webstore/detail/printerlogic-extension-v1/bfgjjammlemhdcocpejaompfoojnjjfn
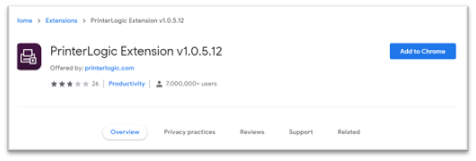
Step 4: Pop-up for Chrome Web Store will open for the you to install the PrinterLogic Extension. Please click “Add to Chrome”.
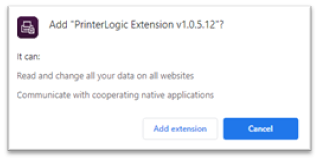
Step 5: Once a pop-up is provided you will need to accept the “Add Extension”.
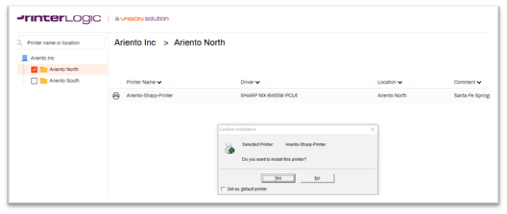
Step 6: After installing the Chrome Extension, go back to the PrinterLogic icon and click on the specific printer you like to connect to and download.
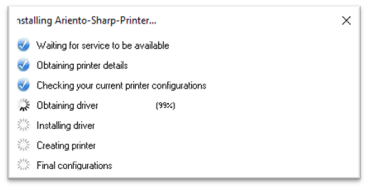
Step 7: Installer bar will appear.
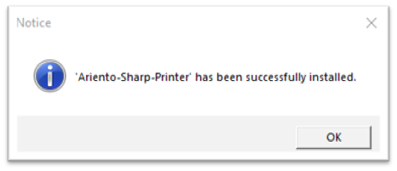
Step 8: Lastly, the “Notice box” will pop-up with printer completion.
Step 9: Printer will now show up as an option when you are printing. You may need to exit the application you were using first if it doesn’t show up immediately.
Comments
0 comments
Please sign in to leave a comment.